How To Guides
Need help? Reach out to our support team at [email protected].
Table of Contents
How to Format Your Dataset for LLM Fine-Tuning
Whether you're fine-tuning a model to follow specific instructions or to carry out natural conversations, it's essential to format your data correctly. This guide will help you understand the two main types of fine-tuning and how to prepare your dataset for the best results.
Instruction vs. Conversation Fine-Tuning
There are two common ways to fine-tune language models: Instruction-based fine-tuning and Conversation-style fine-tuning. Each has a different goal and structure.
Instruction Fine-Tuning
Goal: Teach the model to complete specific tasks when given an instruction.
This approach is best if you're training a model to answer questions, summarize text, extract data, rewrite content, or follow specific commands.
Each example in your dataset should contain:
- Instruction – A clear command or question.
- Input (optional) – Extra context or content needed to complete the instruction.
- Output – The correct or ideal response the model should produce.
Examples of correct formatting:
{"instruction": "Summarize the following
                                    article", "input": "This is a long news
                                    article...", "output": "The article
                                    discusses..."}
{"instruction": "Convert this sentence
to passive voice", "input": "The dog chased
the cat.", "output": "The cat was chased by
the dog."}In some formats, these fields may be named differently, like article/summary, or INSTRUCTION/RESPONSE, but the concept is the same.
Important: Always provide high-quality instructions and outputs. If you don't need additional context, you can leave the input field empty.
Conversation Fine-Tuning
Goal: Train the model to behave more like a helpful chatbot.
This is useful when you want the model to carry out multi-turn conversations, follow context, and mimic a natural back-and-forth dialogue.
Each example should be a conversation history represented as a list of messages. Every message includes:
- Role – Who is speaking (user, assistant, etc.)
- Content – What they said.
Example of correct formatting:
{
  "conversations": [
    {"role": "user", "content": "Hi! Can you help me plan a trip?"},
    {"role": "assistant", "content": "Of course! Where would you like to go?"},
    {"role": "user", "content": "Somewhere warm with a beach."}
  ]
}
This structure helps the model learn how to respond appropriately in a dialogue, maintain context, and sound more conversational.
Dataset Size Guidelines
For fine-tuning to be effective, more high-quality data generally leads to better results.
- Minimum size: 100 examples – this can work for very simple use cases or experiments.
- Recommended size: 1,000+ examples – provides more consistent and robust performance.
- Larger is better: You can combine your own data with public datasets (e.g. from Hugging Face) or generate synthetic examples to increase variety and coverage.
Note: Always make sure your dataset is clean, relevant, and well-formatted. Poor data quality will lead to poor model performance, no matter how much data you use.
Synthetic Data (Coming Soon)
Soon, our platform will support synthetic data generation — a powerful way to grow or improve your dataset with automatically generated examples.
You'll be able to:
- Generate new instruction-following examples or conversation threads.
- Create variations of existing data to increase diversity.
- Bootstrap an initial dataset if you don't have one yet.
This feature will help you save time and improve your model's capabilities — especially if you're starting with a small dataset.
Stay tuned for updates.
If you're unsure how to format your dataset, our platform will validate it and show you tips or errors before training. You can also preview your data to make sure everything looks right.
How to Prepare a Dataset for Image LoRA Training
If you're looking to fine-tune a diffusion model (such as for generating art, characters, styles, or specific objects), you can do so using a technique called LoRA training. This lets you train lightweight, efficient modifications to a base model using your own dataset.
This guide will walk you through how to build and format your dataset properly so it's ready to upload and train.
What You Need
To train an image LoRA, you need images and text prompts that describe each image. These text prompts help the model understand what's in the image so it can learn to generate similar visuals later.
Dataset Requirements:
- Image files (JPEG or PNG) — .jpg, .jpeg, or .png
- Prompt files (Plain text) — .txt files with matching filenames
- The image and text prompt must share the same filename (excluding the extension)
Using a Keyword in Your Prompts (Very Important)
When training an image LoRA, you must include a unique keyword or token in every prompt that tells the model what concept it's learning. Later, you'll use this same keyword to activate the LoRA during generation.
Example
Let's say you're training a LoRA for a specific
fantasy armor style. You choose the keyword: 3dicon
Your dataset might look like this:
3d_icon1.jpg
3d_icon1.txt: a 3dicon, a colorful phone with a rainbow background

3d_icon2.jpg
3d_icon2.txt: a 3dicon, a red play button on a dark blue background

3d_icon3.jpg
3d_icon3.txt: a 3dicon, a green owl icon on a green background
The keyword 3dicon is present in every prompt and tied directly to the
visual features in the images.
Why the Keyword Matters
- During training: The model learns to associate that specific token (e.g. 3dicon) with the visual patterns in the dataset.
- During generation: You can use prompts like "a 3dicon of a music note icon on a red background" and the model will apply the learned visual concept.
If you forget the keyword, the model may still learn something, but you won't be able to reliably activate or control it later. The result may also "leak" into unrelated generations.
Dataset Structure
Your dataset folder should look like this:
lora-dataset/
├── yarn1.jpg
├── yarn1.txt
├── yarn2.jpg
├── yarn2.txt
├── yarn3.jpg
├── yarn3.txt
For every image (.jpg or .png), there must be a corresponding .txt file that contains a prompt describing the image.
Example Prompts
Here are a few examples of what your .txt files might look like:
This example is taken from the Yarn Art Style dataset, where the keyword is "yarn art style"
yarn1.jpg:
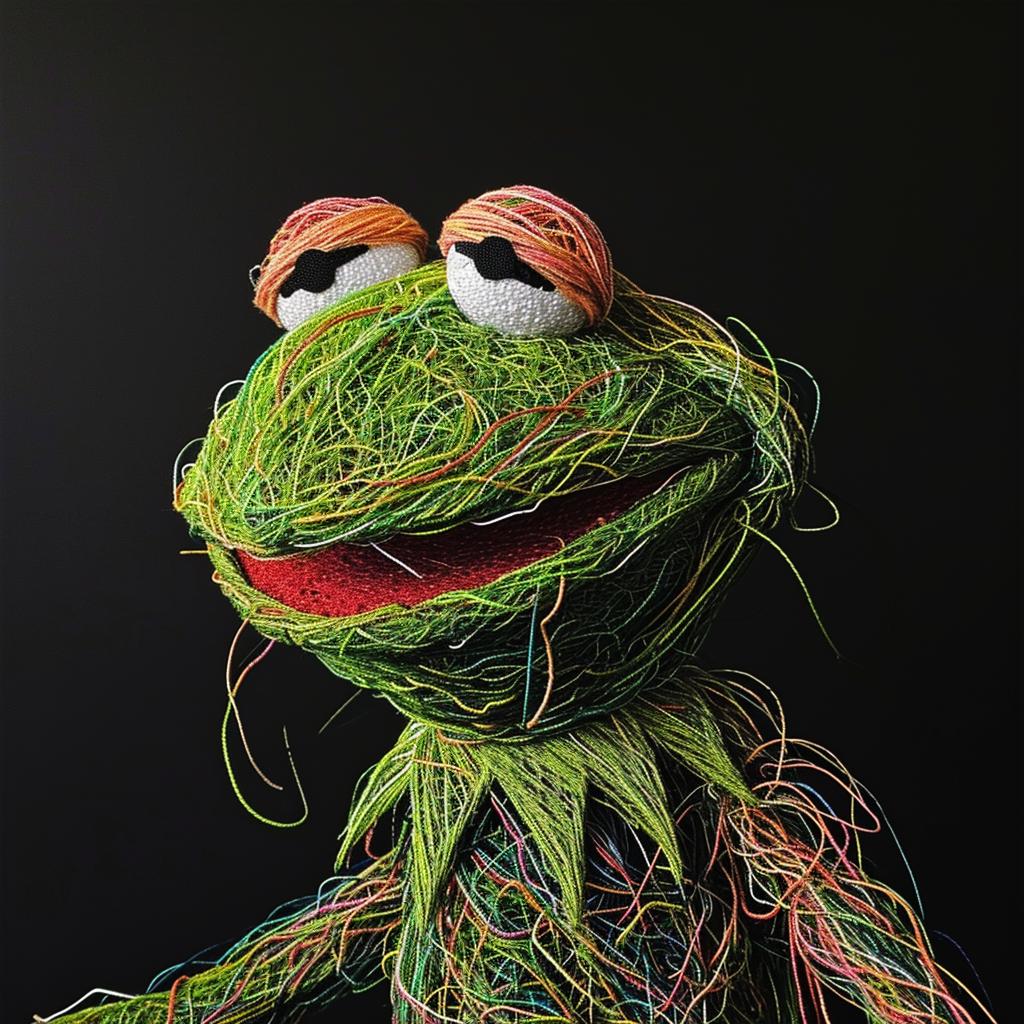
yarn1.txt:
Frog, yarn art styleyarn2.jpg:

yarn2.txt:
A bunch of colorful flowers, yarn
                                            art style
yarn3.jpg:
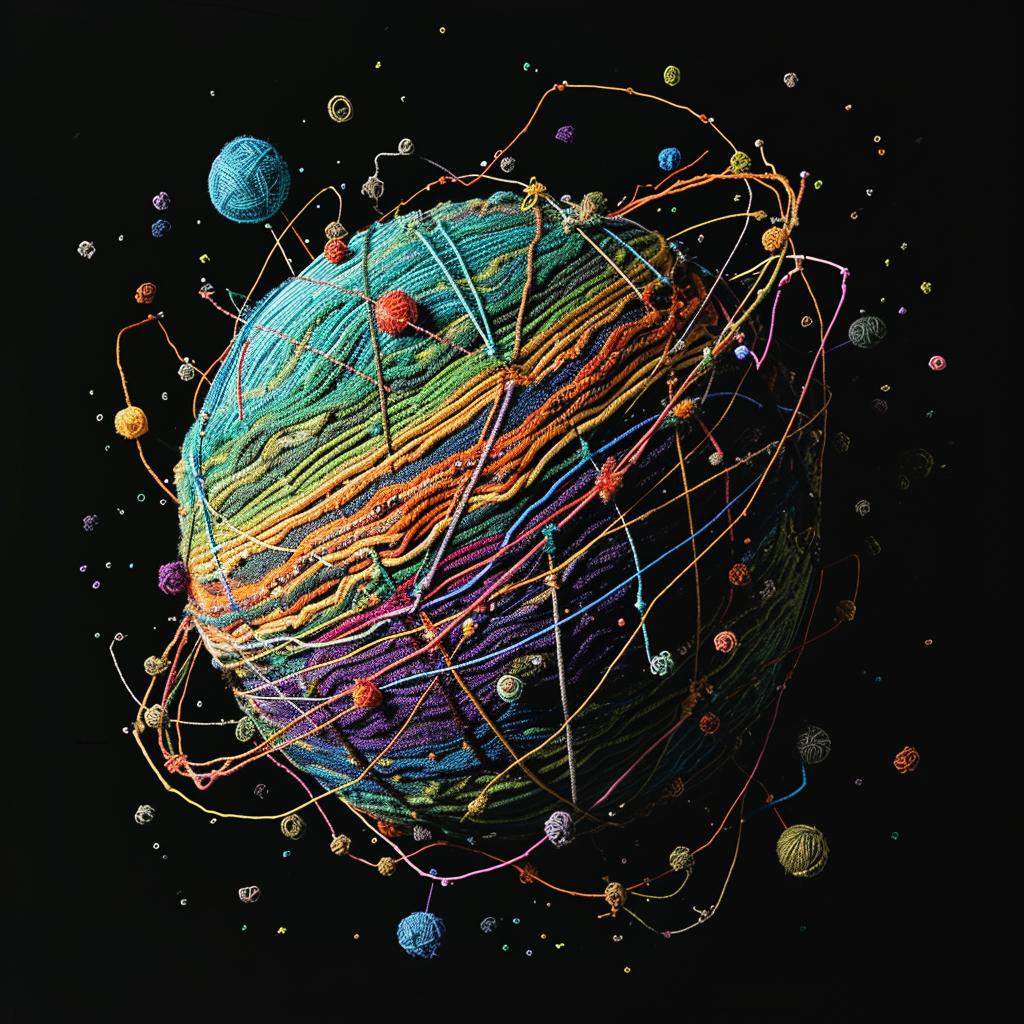
yarn3.txt:
A planet, yarn art styleThe quality of your prompts matters. Be descriptive and specific, similar to how you would describe an image to a generative model like Stable Diffusion or DALL·E.
Minimum Dataset Size
- Minimum recommended: 10–20 image/prompt pairs for basic concept learning
- Better results: 50–100+ pairs for stylistic or character modeling
- Ideal range: 100–500+ pairs depending on the complexity of what you're training
The more diverse and descriptive your prompts, the better your LoRA will perform.
Compressing Your Dataset
Once your dataset is ready and well-organized, you need to compress it into a .zip file for uploading.
Steps:
- Make sure all your image and prompt files are in a single folder (e.g. my-lora-dataset/)
- Compress the folder into a zip archive:
- On Windows: Right-click the folder > "Send to" > "Compressed (zipped) folder"
- On macOS: Right-click the folder > "Compress"
- On Linux: Run
zip -r lora-dataset.zip
                                            lora-dataset/
from the terminal
- Do not place the zip inside another folder before uploading. The zip file should contain your .jpg/.txt pairs directly or in a single root folder.
Final Checklist Before Uploading
Once you're ready, upload the .zip to the platform and start training your custom image LoRA.